Battery switch on travel trailer function is crucial for managing your RV’s power. Understanding how your battery switch works – whether it’s a single, dual, or rotary switch – is key to preventing dead batteries and keeping your lights on. This guide breaks down the different types, their pros and cons, troubleshooting tips, and essential safety precautions to keep you powered up on your next adventure.
We’ll cover everything from the basic function of the switch in distributing power between your house batteries and your vehicle’s starting battery to more advanced topics like maintenance, troubleshooting common problems, and maximizing battery life. Learn how to correctly use your battery switch to avoid costly repairs and enjoy worry-free camping.
Battery Switch Types in Travel Trailers
Choosing the right battery switch for your travel trailer is crucial for managing your power sources efficiently and safely. Different types offer varying levels of control and complexity, each with its own set of advantages and disadvantages. Understanding these differences will help you select the best option for your needs.
Single Battery Switch
A single battery switch is the simplest type, offering a single on/off switch for your trailer’s battery. This is suitable for trailers with only one battery and those who don’t need complex power management. It’s straightforward to use and inexpensive. However, it lacks the flexibility to manage multiple batteries or isolate the house battery from the chassis battery.
This means that if you have a problem with one, it can affect the other.
Dual Battery Switch
Dual battery switches allow you to independently control two batteries, typically a chassis battery (for starting the vehicle) and a house battery (for powering the trailer’s appliances). This provides more control and safety, as you can isolate one battery if there’s a problem, preventing drain on the other. For example, if your house battery dies, you can still start your tow vehicle.
They are relatively inexpensive and easy to install. The main drawback is the limited number of batteries they can manage.
Rotary Battery Switch
Rotary switches offer multiple positions, allowing for more control over multiple batteries or battery banks. These switches typically offer options to connect and disconnect various combinations of batteries, offering a more versatile system for managing complex power needs. For instance, you could connect both batteries for combined power, isolate one battery for charging, or completely disconnect all batteries. This flexibility is great for larger trailers with multiple batteries or those who require more precise power management.
However, they are more expensive and can be more complex to install and operate than simpler switches.
Comparison Table of Battery Switch Types
| Feature | Single Switch | Dual Switch | Rotary Switch |
|---|---|---|---|
| Number of Batteries Controlled | 1 | 2 | 2 or more |
| Control Level | On/Off | Independent On/Off for each battery | Multiple configurations (e.g., both on, one on, both off, etc.) |
| Cost | Low | Medium | High |
| Maintenance | Low | Low | Low to Medium (depending on complexity) |
Function and Purpose of the Battery Switch

The battery switch in your travel trailer is a crucial component of its electrical system, acting as a central control for power flow. It allows you to selectively connect and disconnect your house batteries (used for appliances and lights inside the trailer) from the tow vehicle’s starting battery. This seemingly simple function offers significant benefits in terms of managing power and preventing costly damage.The battery switch manages power distribution by acting as a gatekeeper.
In the “ON” position, it connects the house batteries to the trailer’s electrical system, allowing your lights, refrigerator, and other appliances to draw power. Simultaneously, it often also provides a charging path from the tow vehicle’s alternator (when the vehicle is running) to charge the house batteries. In the “OFF” position, it completely isolates the house batteries from the trailer’s system and the vehicle’s charging system.
This prevents the house batteries from draining the starting battery of your tow vehicle, and vice versa.
Battery Switch Use Cases
Proper use of the battery switch is essential for maintaining the health and longevity of your batteries and preventing unexpected electrical problems. Leaving the switch in the “ON” position when the trailer is not connected to the tow vehicle could lead to a completely drained house battery bank. Similarly, if the house batteries are deeply discharged, leaving the switch ON could drain the starting battery of your tow vehicle and leave you stranded.
Several scenarios highlight the importance of utilizing the battery switch correctly:Preventing battery drain: When your travel trailer is stored for extended periods, switching off the house batteries prevents parasitic drain from things like low-level electronics that consume power even when turned off. This ensures your batteries retain their charge and are ready to use when you’re back on the road.
So, you’re an audiophile who travels? Awesome! Make sure you check out this guide on setting up an amazing audiophile travel setup before you go. It’s crucial to protect your precious gear, and while you’re at it, don’t forget travel insurance! Getting Aon travel insurance will give you peace of mind knowing your investment is covered in case of any mishaps.
That way, you can focus on enjoying your tunes wherever your adventures take you!
For example, a small amount of power draw from a smoke alarm or carbon monoxide detector over several weeks could completely drain your batteries if the switch is left in the ON position.Isolating batteries during maintenance: Before performing maintenance on either the house batteries or the starting battery, switching off the affected battery isolates it from the rest of the electrical system.
This prevents accidental short circuits or shocks, making maintenance safer and more efficient. For instance, when jump-starting the tow vehicle’s battery, it’s crucial to turn off the house battery switch to avoid potentially damaging sensitive electronics in the travel trailer.Protecting against reverse current flow: In some setups, the battery switch also helps to prevent reverse current flow.
If the tow vehicle battery has a lower voltage than the house batteries (perhaps due to a weak starting battery), the switch can prevent current from flowing from the house batteries into the vehicle battery, which can damage the alternator or other vehicle electrical components.
Troubleshooting Common Battery Switch Issues
Your travel trailer’s battery switch is a crucial component, controlling the flow of power to your house batteries. Problems with this switch can leave you stranded without lights, appliances, or the ability to charge your batteries. Understanding common issues and how to troubleshoot them is essential for maintaining your RV’s electrical system.A malfunctioning battery switch can manifest in several ways, often stemming from simple problems that are easily fixed.
The most common issues involve the switch itself, its connections, or corrosion buildup. Fortunately, most troubleshooting can be done with basic tools and a little know-how.
Battery Switch Malfunction Diagnosis
A faulty battery switch might not always be immediately obvious. Symptoms can range from intermittent power loss to a complete lack of power to your house batteries. A systematic approach to diagnosis is key.
- Visual Inspection: Begin by carefully inspecting the switch itself. Look for any signs of damage, such as cracks, burns, or loose components. Check the switch’s position – is it firmly in the “on” position? A loose or damaged switch may need replacement.
- Connection Inspection: Examine the wiring connections to the switch. Look for loose, corroded, or broken wires. Corrosion often appears as a greenish or whitish buildup on the terminals. Clean any corrosion with a wire brush and apply dielectric grease to prevent future corrosion.
- Testing with a Multimeter: If the visual inspection doesn’t reveal the problem, use a multimeter to test the switch’s functionality. First, set the multimeter to check continuity (usually represented by a symbol that looks like a diode). Then, touch the probes to the terminals of the switch in its “on” position. A continuous beep or a near-zero resistance reading indicates a good connection.
If there’s no beep or a high resistance reading, the switch is likely faulty and needs replacing.
- Testing Battery Voltage: With the switch in the “on” position, use the multimeter to check the voltage at the battery terminals and at the output terminals of the switch. A significant voltage drop indicates a problem within the switch or its connections. For example, if your battery shows 12.6V but the output shows only 10V, there’s a problem in the circuit between the battery and the output of the switch.
Repairing a Faulty Battery Switch
Once you’ve identified the problem, repairing a faulty switch is usually straightforward.
- Cleaning Corrosion: If corrosion is the culprit, carefully clean the terminals with a wire brush and baking soda solution. Thoroughly rinse and dry the area before reconnecting the wires. Apply dielectric grease to the cleaned terminals to prevent future corrosion.
- Tightening Connections: Ensure all wire connections are securely tightened. Loose connections can lead to intermittent power issues. Use the correct size wrench or screwdriver to avoid damaging the terminals.
- Replacing the Switch: If the switch itself is faulty, replacing it is often the best solution. Disconnect the power to the switch before attempting any replacement. Carefully note the wiring configuration before disconnecting to ensure proper reconnection. Install the new switch, ensuring all connections are secure and properly tightened.
Safety Precautions When Using the Battery Switch
Working with batteries and electrical systems in your travel trailer requires caution. Improper handling can lead to serious injury or damage to your RV. This section details essential safety measures to protect yourself and your equipment when using the battery switch.Understanding the potential hazards is crucial. Incorrect operation of the battery switch can create short circuits, resulting in sparks, fire, and potentially severe burns.
Direct contact with battery terminals or exposed wires can cause electrical shocks, potentially fatal. Battery acid is corrosive and can cause skin burns and eye damage. Always treat battery work with respect and prioritize safety.
Battery Switch Safety Checklist Before Use
Before ever touching the battery switch or any related components, always perform this safety check. Failing to do so could lead to serious injury or equipment damage. This checklist provides a step-by-step approach to safe operation.
- Inspect the battery switch for any visible damage, loose connections, or corrosion. Replace or repair any damaged components before proceeding.
- Ensure the area is well-ventilated to prevent the buildup of potentially explosive hydrogen gas emitted by batteries.
- Wear appropriate safety gear, including safety glasses or a face shield, rubber gloves, and closed-toe shoes. Long sleeves and pants are also recommended.
- Have a fire extinguisher rated for electrical fires readily available.
- Know the location of your nearest emergency contact and be prepared to seek immediate medical attention if necessary.
Battery Switch Safety Checklist After Use
After using the battery switch, take these steps to ensure safety and prevent future issues. These steps help maintain the integrity of your system and protect you from potential hazards.
- Confirm the battery switch is in the desired position (on or off) and that all connections are secure.
- Visually inspect the battery terminals and connections for any signs of corrosion or damage. Clean and tighten any loose connections.
- Properly store any tools or equipment used.
- Wash your hands thoroughly with soap and water after handling batteries or battery components to remove any traces of battery acid.
Risks of Incorrect Battery Switch Operation, Battery switch on travel trailer function
Improper operation of the battery switch can have severe consequences. A short circuit can occur if the switch is accidentally activated while the batteries are connected to a load, causing a large current to flow through the switch and potentially igniting flammable materials. Similarly, accidental contact with live terminals can lead to a dangerous electrical shock. Even seemingly minor mistakes can lead to significant issues, emphasizing the importance of careful operation.
Always double-check the switch position before and after use to avoid unintended consequences.
Battery Switch Maintenance and Upkeep
Regular maintenance of your travel trailer’s battery switch is crucial for ensuring its longevity and reliable performance. Neglecting this simple task can lead to premature failure, leaving you stranded with dead batteries. A little preventative care goes a long way in avoiding costly repairs and frustrating breakdowns.Proper maintenance involves a combination of regular inspections, cleaning, and lubrication. This helps prevent corrosion, ensures smooth operation, and extends the lifespan of your battery switch.
Following a simple maintenance schedule will keep your system functioning optimally for years to come.
Battery Switch Inspection and Cleaning Schedule
A proactive approach to battery switch maintenance is essential. This involves regular visual inspections and cleaning to identify and address potential problems before they escalate. A simple visual check should be part of your pre-trip routine, while a more thorough cleaning should be performed at least twice a year, or more frequently in harsh environments.
- Monthly Inspection: Visually inspect the switch for any signs of damage, loose connections, or corrosion. Check the surrounding area for any signs of leakage or damage to the wiring.
- Semi-Annual Cleaning: Use a wire brush or a battery terminal cleaner to remove any corrosion from the switch terminals and connecting wires. Apply a corrosion inhibitor after cleaning to prevent future buildup. Pay close attention to the area where the wires connect to the switch.
- Annual Lubrication: Apply a small amount of dielectric grease to the switch’s moving parts to ensure smooth operation and prevent corrosion. This is particularly important for switches with moving levers or handles.
Importance of Clean Battery Terminals
Corrosion on battery terminals is a common problem that can significantly impact the performance of your battery system. Corrosion acts as an insulator, hindering the flow of electricity and reducing the battery’s ability to charge and discharge efficiently. This can lead to decreased battery life, slow cranking, and even complete failure of your electrical system. The buildup of corrosion also increases resistance, leading to heat generation and potential fire hazards.
Proper Lubrication of Switch Components
Lubricating the moving parts of your battery switch is crucial for maintaining smooth and reliable operation. A suitable lubricant, such as dielectric grease, prevents corrosion and reduces friction. Dielectric grease is specifically designed for electrical applications and prevents short circuits while providing excellent lubrication.Applying the grease is a straightforward process. Simply apply a small amount to the moving parts of the switch, ensuring even coverage.
Avoid excessive application, as this can attract dirt and debris. Regular lubrication, as part of your semi-annual cleaning routine, will help to ensure the longevity and smooth operation of your battery switch.
Integrating the Battery Switch into the Electrical System
Properly integrating your battery switch into your travel trailer’s electrical system is crucial for safe and reliable power management. This involves understanding the typical wiring layout and ensuring all connections are secure and correctly polarized. A poorly installed switch can lead to electrical malfunctions, damage to your appliances, or even fire hazards.
The typical wiring diagram for a travel trailer’s 12V system includes the battery, the battery switch, the distribution panel, and various loads (lights, water pump, etc.). The battery switch acts as a master disconnect, allowing you to completely isolate the battery from the rest of the system when not in use. This prevents unwanted drain on your battery and improves safety.
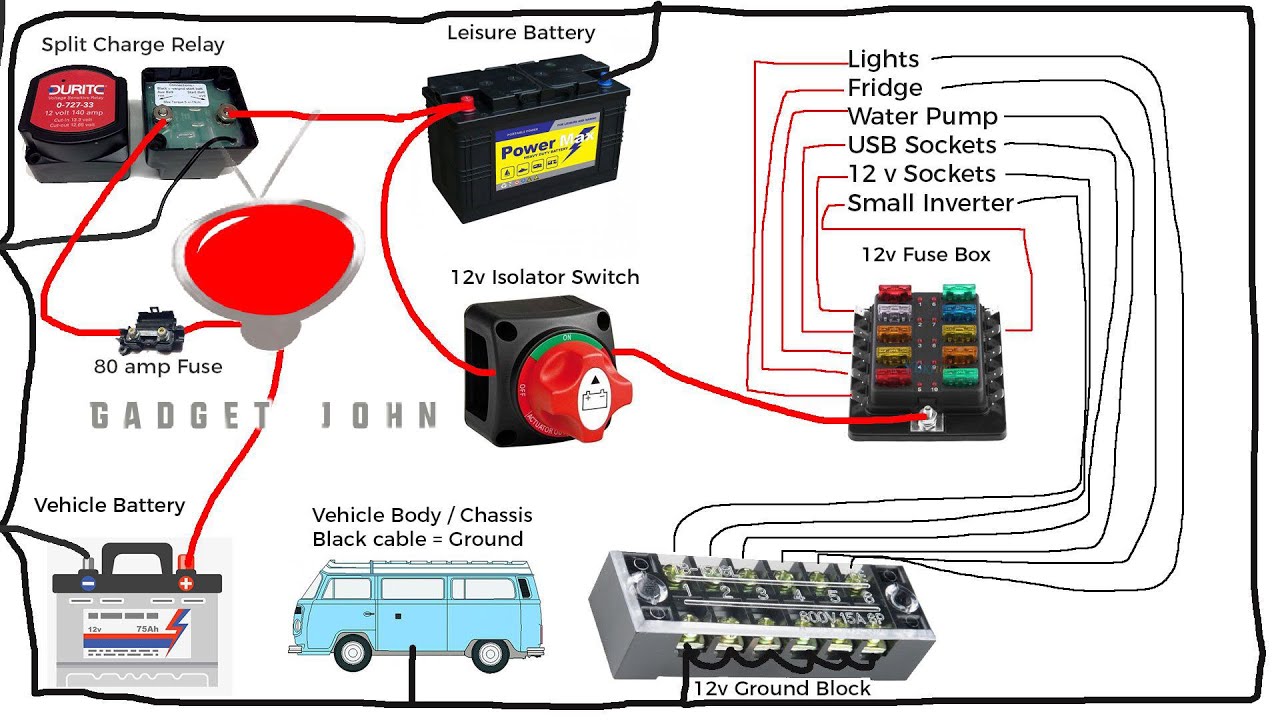
Typical Wiring Diagram
Imagine a diagram. At the top, you have your battery (+ and – terminals). A heavy-gauge wire runs from the positive (+) battery terminal directly to the input terminal of the battery switch. Another heavy-gauge wire connects the output terminal of the battery switch to the positive bus bar of your 12V distribution panel. This bus bar acts as a central distribution point for power to all your 12V appliances.
A separate heavy-gauge wire connects the negative (-) battery terminal directly to the chassis of your trailer, providing a ground path. Finally, from the distribution panel, smaller gauge wires run to individual appliances, each with a fuse or circuit breaker for protection. All connections should be made using appropriate connectors and crimped securely.
Tools and Materials for Battery Switch Installation or Replacement
Having the right tools and materials on hand before starting any electrical work is essential for a safe and efficient installation. Improper tools can lead to damage or injury.
So, you’re an audiophile who travels? Awesome! Make sure you check out this guide on creating the perfect audiophile travel setup before your next trip – it’ll save you headaches. And speaking of trips, don’t forget to sort out your travel insurance! Getting Aon travel insurance beforehand is a smart move; you’ll enjoy your vacation more knowing you’re covered for unexpected events.
Peace of mind is priceless, especially when you’re carrying around expensive audio gear!
- Heavy-duty wire strippers/cutters
- Crimping tool with appropriate dies for your wire gauge and connector type
- Wire connectors (butt connectors, ring terminals, etc.)
- Test light or multimeter
- Screwdrivers (Phillips and flathead)
- Wrench (size appropriate for your battery terminals and switch mounting)
- Safety glasses
- Appropriate gauge wire (consult your trailer’s wiring diagram)
- Heat shrink tubing (for added protection of wire connections)
- New battery switch (if replacing)
Installation Process Comparison: Different Battery Switch Types
The installation process varies slightly depending on the type of battery switch (e.g., single-pole, double-pole, double-throw). However, the core principles remain the same: ensuring safe and secure connections. Here’s a general overview.
For a single-pole switch, the positive wire from the battery connects to the input, and the output goes to the distribution panel. For a double-pole switch, both the positive and negative wires from the battery are connected, offering complete isolation. A double-throw switch allows switching between two batteries, but the wiring complexity increases. Always refer to the manufacturer’s instructions for your specific switch model.
Regardless of the switch type, always disconnect the battery’s negative terminal before working on the electrical system. This is a crucial safety precaution to prevent accidental shocks or short circuits. After installation, always double-check all connections and test the switch’s functionality before reconnecting the negative terminal.
Impact of Battery Switch on Battery Life: Battery Switch On Travel Trailer Function
Your travel trailer’s battery switch is more than just an on/off button; it’s a key component in managing your battery’s health and lifespan. Proper use significantly impacts how long your batteries last, while misuse can lead to premature failure and costly replacements. Understanding this relationship is crucial for maximizing your investment and minimizing downtime.Proper use of the battery switch helps extend battery life by preventing parasitic drain.
When the switch is off, it completely isolates the house batteries from the trailer’s electrical system, preventing any unintentional discharge that can slowly deplete the batteries over time. This is especially important during storage periods when the trailer isn’t being used. Conversely, improper usage, such as leaving the switch in the “on” position when the trailer is not in use, will result in a constant draw on the battery, slowly but surely reducing its lifespan.
Think of it like leaving your car lights on – eventually, the battery will die.
Battery Switch Usage and Lifespan Extension
Effective battery switch management is key to prolonging the life of your travel trailer batteries. Regularly turning off the battery switch when your trailer is not in use prevents constant, small drains that accumulate over time. This prevents sulfation, a common cause of premature battery failure. Sulfation occurs when lead sulfate crystals build up on the battery plates, hindering their ability to accept and release charge.
Consistent deep discharging, often a result of leaving the switch on unnecessarily, accelerates sulfation. Furthermore, consistently monitoring your battery voltage will help you catch potential problems early on. A gradual decrease in voltage over time, even when the trailer isn’t in use, may indicate a parasitic drain, highlighting the importance of using the battery switch correctly. Consider installing a battery monitor to easily track battery voltage and health.
Consequences of Improper Battery Switch Use
Improper use of the battery switch can significantly shorten the lifespan of your batteries. Leaving the switch in the “on” position while the trailer is in storage or not in use leads to constant, low-level discharge. This constant drain depletes the batteries, causing them to eventually fail prematurely. For example, imagine a scenario where you leave your trailer stored for several months with the battery switch in the “on” position.
Even with minimal draw from low-power devices like a clock, the battery will gradually discharge. This constant cycling between charging and discharging stresses the battery and accelerates the sulfation process, leading to significantly reduced lifespan and potentially requiring a battery replacement much sooner than expected. This is especially true for lead-acid batteries, which are more susceptible to sulfation than other battery types.
Best Practices for Battery Switch Management
Always turn off the battery switch when your travel trailer is not in use for extended periods, such as during storage. Regularly check your battery voltage to ensure they are not experiencing a slow drain. If you notice a consistent drop in voltage even when the switch is off, you may have a parasitic drain somewhere in your trailer’s electrical system, which requires professional attention.
Before storing your trailer for an extended time, consider using a trickle charger to maintain a consistent charge. This will keep your batteries in optimal condition and prevent sulfation. Finally, invest in high-quality deep-cycle batteries designed for recreational vehicles; these batteries are better equipped to handle the repeated cycles of charging and discharging inherent in travel trailer use.
Mastering your travel trailer’s battery switch is about more than just flipping a switch; it’s about ensuring reliable power and extending the life of your valuable batteries. By understanding the different types of switches, their functions, and essential safety procedures, you can confidently manage your RV’s electrical system and enjoy peace of mind on the road. Remember regular maintenance and safe operating practices are your best bet for preventing issues and maximizing your RV’s battery life.
Query Resolution
What happens if I leave my battery switch on all the time?
Leaving your battery switch on constantly can drain your house batteries, especially if you have parasitic draws (devices using power even when turned off). It’s best to turn it off when not using the RV for extended periods.
How often should I clean my battery switch and terminals?
Inspect your battery switch and terminals at least every three months and clean them as needed. Corrosion can build up and impede power flow.
My battery switch is stuck. What should I do?
Try lubricating the switch mechanism with a suitable lubricant. If it remains stuck, you may need to replace the switch.
Can I use any type of lubricant on my battery switch?
No, use only a dielectric grease designed for electrical components. Other lubricants can attract dirt and moisture, causing damage.
